 This is the golden gun finished with the texture, I looked on-line for a gold texture and found a handy tutorial which explains step by step on how to achieve the gold look. I am really please with how the gun has turned out and it has made me think that I should change the material on the Martini bottle and have the texture as glass and figure out how to add the decals over the glass. Overall I am happy that I have three models and I look forward to animating them and improving them, I am currently thinking of ways that I can improve on what I already have.
Thursday
Completed Golden Gun
This is the golden gun finished with the texture, I looked on-line for a gold texture and found a handy tutorial which explains step by step on how to achieve the gold look. I am really please with how the gun has turned out and it has made me think that I should change the material on the Martini bottle and have the texture as glass and figure out how to add the decals over the glass. Overall I am happy that I have three models and I look forward to animating them and improving them, I am currently thinking of ways that I can improve on what I already have.

Golden gun without texture
 This is the basic shape of the golden gun, I started by placing a reference plate with a picture of the gun so I could scale the components accordingly. I started off with the cigarette case which makes the hand part of the gun, I had to indent the top and round the edges to get the right shape. To round the edges I made a cylinder and aligned it with the shape, I then used the vertex's to manipulate the shape so it aligned with the cylinder. I then added the top of the cigarette case which is placed under the the barrel and connects to the trigger, for this I cloned the case and just cut the size of the main rectangle. I added the trigger by creating a cylinder and extruding a pin out which is what connects with the cigarette case and causes the gun to fire. The next stage was the lighter which sits on top of the cigarette case, this was simply a rectangle, with a different compartment coming out to make the attachment for the barrel. The last part to construct was the barrel, I simply used the cylinder tool to make the main part and extruded at the end to enhance the look. It was hard to get the detail into the model such as the detailed texture on the lighter, but hopefully this can be added during the texturing process.
Golden gun

Here is a picture of the golden gun, as you can see there is a pen, also there is a lighter, these objects will have to be incorporated into the design when I come to modelling the gun.
Golden Gun
The third and final model I am going to create is the golden gun. This was inspired because I like the gadget side of 007 and also the action side with guns and fighting, so this combined two elements of James Bond which I really enjoy. Also I am planning to have my final animation based around a poker table and the gun could rest on the table with the other models.
The golden gun is made up from different components that can easily be found, it is an ingenious idea using a lighter, pen, cigarette case and cuff links and the fact that its 24 carat gold tops it off. I think the challenge with the golden gun will be to get across which parts are which.
The golden gun is made up from different components that can easily be found, it is an ingenious idea using a lighter, pen, cigarette case and cuff links and the fact that its 24 carat gold tops it off. I think the challenge with the golden gun will be to get across which parts are which.
Wednesday
Card texture faces

An error occurred when I tried to submit this post. This is the texture faces document that you can save from 3Ds Max which you can use in Photoshop to apply textures. By filling in the faces with what textures you want it is a very simple and flexible way to add texture to the model. These are the texture plates for the playing cards. As you can see the front and the back of the playing cards are easy to edit and you can fill it in with what you want on Photoshop. It was more tricky with the bottle because it was rounded which complicated the process a lot more. Using the texture faces document that you can save from 3Ds max I feel that you can add decals very easily, and it is very effective for square of non rounded objects.
Playing Card
 This is the first card that I created I used the square tool to create the shape of the card and used the 'unwrap uvw' to apply the texture, the picture I chose for the back of the cards reminded me of the intro to Casino royale which I quite like. Because I used the same texturing technique to apply to the Martini this card was quick to make. I am now becoming more familiar with the tools which is helping with the construction of the models. When I come to make my animation I want more than the three standard models because I would like to make a poker table for them to sit on and adjust a few things to make the models look right.
Update.
I have a picture to show the Royal flush, I added the floor surface in to help the cards stand out from the plain background.
Rendered Martini Bottle
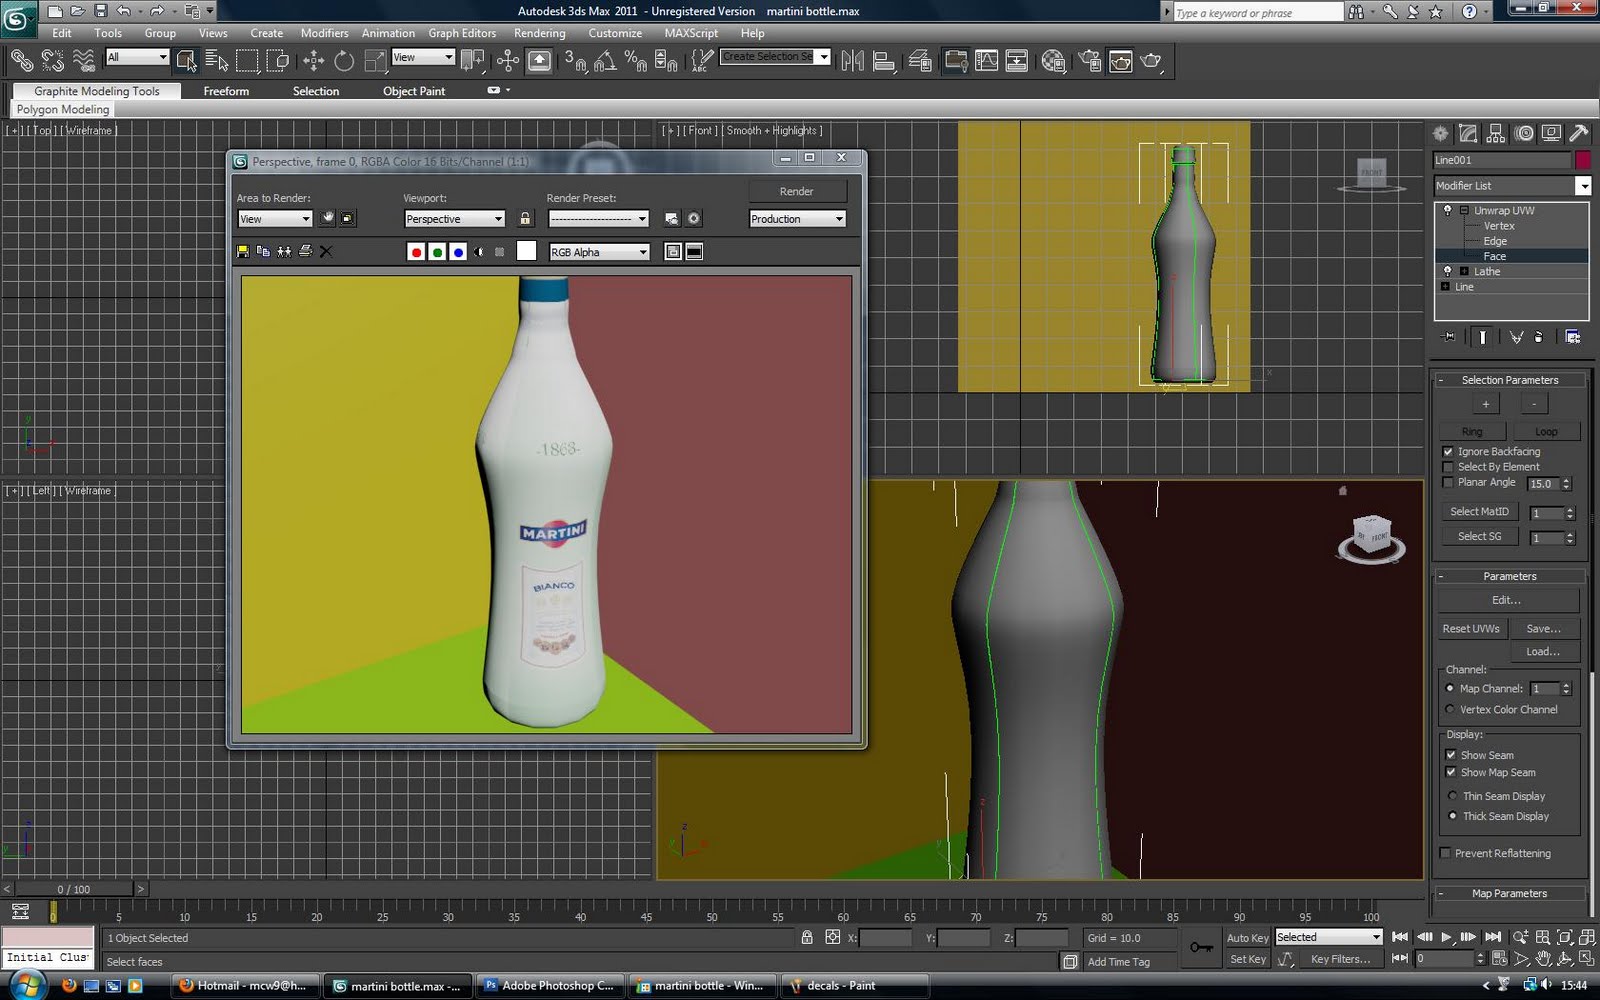 Here is the rendered copy of my Martini bottle. Although I am happy to have my first model complete I do not feel satisfied with the final result, I spent a lot of time editing the textures and getting them to look correct that I feel it would be a small step backwards to get a large step ahead by adding the glass effect.
In this image you can see to the right there is a box which you can click to edit the parameters, when you click the box you get the object faces outline on a grid, this is where you can get the outlined mapping shape for the object to edit in Photoshop.
With the Martini bottle now complete I am going to move on to my next model which is going to be a royal flush poker hand. I am inspired to do the cards as I really like the intro from Casino Royale and for my animation I may create a poker table to put the Martini bottle and the playing cards on.
Subscribe to:
Posts (Atom)